Computer Concepts in Action ©2009Unit 7:
PresentationsUse Drawing Tools to Enhance Your PresentationMicrosoft PowerPoint is a powerful software program for creating presentation material. You can use any combinations of words, pictures, sounds, and video to help support a speech or public presentation. In the following exercise, you will use graphics to add visual impact to a presentation designed to introduce a new line of car. To open the data file in Step 1, click on the link. If you are not able to download the file, ask your teacher for help. - Start Microsoft PowerPoint, and open the data file
 SUV Sales
(51.0K) SUV Sales
(51.0K)
- Save the file as Your Name SUV Sales.
- In the pane on the left of your screen, click the Outline tab to display the slides in Outline View.
- Click the second slide Major Selling Points.
- Click the Home tab, if necessary, and click the Shapes button. Locate the Block Arrows category, and click the Right Arrow shape (see Figure 1).
Figure 1 Insert a right arrow.
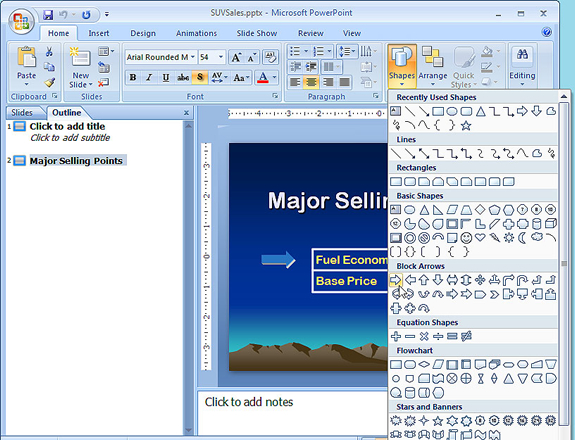 <a onClick="window.open('/olcweb/cgi/pluginpop.cgi?it=jpg::::/sites/dl/free/0078805775/595821/EnrichmentAct7_1_U07_SC01.jpg','popWin', 'width=NaN,height=NaN,resizable,scrollbars');" href="#"><img valign="absmiddle" height="16" width="16" border="0" src="/olcweb/styles/shared/linkicons/image.gif"> (261.0K)</a> <a onClick="window.open('/olcweb/cgi/pluginpop.cgi?it=jpg::::/sites/dl/free/0078805775/595821/EnrichmentAct7_1_U07_SC01.jpg','popWin', 'width=NaN,height=NaN,resizable,scrollbars');" href="#"><img valign="absmiddle" height="16" width="16" border="0" src="/olcweb/styles/shared/linkicons/image.gif"> (261.0K)</a>- In the slide, click under the arrow pointing to Fuel Economy. The new arrow is inserted.
- Drag the arrow so it points at Base Price and lines up under the first arrow.
- Make sure the new arrow is selected. Click the Drawing Tools Format tab, and click the Shape Effects button. Click 3-D Rotation, and click the Oblique Bottom Right option.
- Click the Shape Fill button, and click a color for the arrow (see Figure 2).
Figure 2 Formatting options
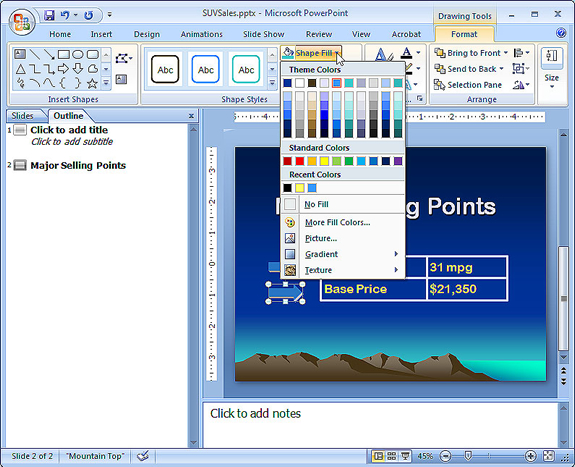 <a onClick="window.open('/olcweb/cgi/pluginpop.cgi?it=jpg::::/sites/dl/free/0078805775/595821/EnrichmentAct7_1_U07_SC02.jpg','popWin', 'width=NaN,height=NaN,resizable,scrollbars');" href="#"><img valign="absmiddle" height="16" width="16" border="0" src="/olcweb/styles/shared/linkicons/image.gif"> (259.0K)</a> <a onClick="window.open('/olcweb/cgi/pluginpop.cgi?it=jpg::::/sites/dl/free/0078805775/595821/EnrichmentAct7_1_U07_SC02.jpg','popWin', 'width=NaN,height=NaN,resizable,scrollbars');" href="#"><img valign="absmiddle" height="16" width="16" border="0" src="/olcweb/styles/shared/linkicons/image.gif"> (259.0K)</a>- Click the Shape Outline button, and click a color for the border.
- Select the second arrow if necessary, and click the Shape Effects button. Click 3-D Rotation then click 3-D Rotation Options. The Format Shape dialog box displays.
- Click 3-D Format in the left pane, and practice adjusting the Bevel, Depth, and Contour settings.
- Close the Format Shape dialog box.
- Save your file and continue to the next activity.
 |