Computer Concepts in Action ©2009Unit 4:
Word ProcessingManage Your PrinterChanging Paper Size Sometimes you may create documents that do not fit on a standard or letter-sized sheet of paper (8½ by 11 inches). For example, you might want to create a poster on larger legal-sized paper (11 by 14 inches). Many times, spreadsheets need to be printed on legal-sized paper. In any of these situations, you will have to change your printer settings to match the size of paper you are going to work with. If you have not completed an Enrichment Activity using the Bake Sale data file, use the  Bake Sale
(22.0K)
data file. Or you can use one of your own documents to complete this activity Bake Sale
(22.0K)
data file. Or you can use one of your own documents to complete this activity - Start Microsoft Word.
- Open the Bake Sale data file or another document.
- Click the Microsoft Office Button, and click Print.
- Click the Properties button in the Print dialog box.
- The Document Properties dialog box displays (Figure 1). (Note: Your Document Properties dialog box may look slightly different from Figure 1).
Figure 1 The Document Properties dialog box
 <a onClick="window.open('/olcweb/cgi/pluginpop.cgi?it=jpg::::/sites/dl/free/0078805775/595818/EnrichmentActivity4_5_U04_SC01.jpg','popWin', 'width=NaN,height=NaN,resizable,scrollbars');" href="#"><img valign="absmiddle" height="16" width="16" border="0" src="/olcweb/styles/shared/linkicons/image.gif"> (45.0K)</a> <a onClick="window.open('/olcweb/cgi/pluginpop.cgi?it=jpg::::/sites/dl/free/0078805775/595818/EnrichmentActivity4_5_U04_SC01.jpg','popWin', 'width=NaN,height=NaN,resizable,scrollbars');" href="#"><img valign="absmiddle" height="16" width="16" border="0" src="/olcweb/styles/shared/linkicons/image.gif"> (45.0K)</a> - Click the Advanced tab to display the Advanced Document Settings (Figure 2).
- Use the arrow next to Paper Size to view all the different paper sizes supported by your printer.
Figure 2 Advanced Document Settings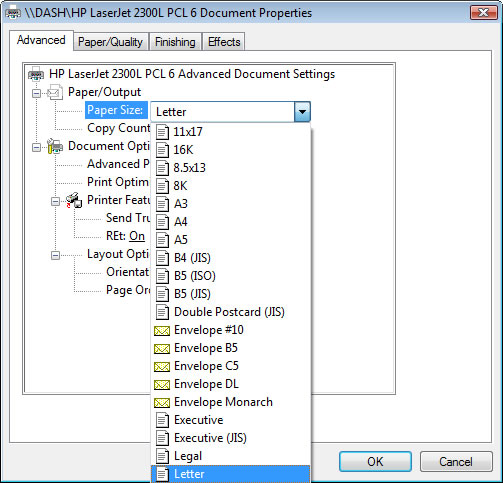 <a onClick="window.open('/olcweb/cgi/pluginpop.cgi?it=jpg::::/sites/dl/free/0078805775/595818/EnrichmentActivity4_5_U04_SC02.jpg','popWin', 'width=NaN,height=NaN,resizable,scrollbars');" href="#"><img valign="absmiddle" height="16" width="16" border="0" src="/olcweb/styles/shared/linkicons/image.gif"> (62.0K)</a> <a onClick="window.open('/olcweb/cgi/pluginpop.cgi?it=jpg::::/sites/dl/free/0078805775/595818/EnrichmentActivity4_5_U04_SC02.jpg','popWin', 'width=NaN,height=NaN,resizable,scrollbars');" href="#"><img valign="absmiddle" height="16" width="16" border="0" src="/olcweb/styles/shared/linkicons/image.gif"> (62.0K)</a> - Select Letter in the Paper Size menu.
- Click OK to close the Document Properties dialog box.
- With your teacher's permission, click OK to print the document.
- Save and close your Bake Sale document.
Manage Your Printer – Part 2 Set a Default Printer At some point you may experience problems with your printer. While complicated issues should be left to professionals, there are some issues that you can easily fix yourself. If you are having problems with your printer, here is a short checklist: - Make sure the printer is plugged in to a live outlet and turned on.
- Check all connections at the printer and at the computer.
- Make sure the printer is online.
- Turn off your printer, and after a few seconds, turn it on again.
- Reboot your computer.
- Print a test document. Many printers have a built-in diagnostics program. Read the user's manual to find out how to run the diagnostics.
- Check and reinstall the printer drivers.
In this exercise you will explore some of these issues by attempting to install a printer that is not actually connected to your computer. - Click the Start button, Control Panel, then Hardware and Sound (Control Panel Home view). Click the Printer link.
- Click the Add a printer button.
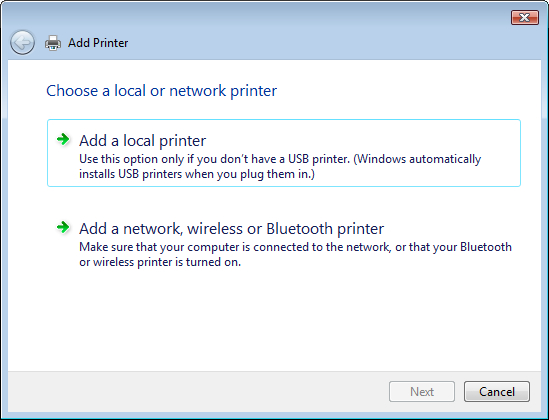
- Select Add a Local Printer (Figure 3).
- Select Use an existing port. In this window, you can verify that your printer is plugged into the correct port setting, but do NOT change it. (With your teacher's permission, see if you can locate the port on your computer).
Figure 3 Add Printer dialog box
 <a onClick="window.open('/olcweb/cgi/pluginpop.cgi?it=jpg::::/sites/dl/free/0078805775/595818/EnrichmentActivity4_5_U04_SC03.jpg','popWin', 'width=NaN,height=NaN,resizable,scrollbars');" href="#"><img valign="absmiddle" height="16" width="16" border="0" src="/olcweb/styles/shared/linkicons/image.gif"> (124.0K)</a> <a onClick="window.open('/olcweb/cgi/pluginpop.cgi?it=jpg::::/sites/dl/free/0078805775/595818/EnrichmentActivity4_5_U04_SC03.jpg','popWin', 'width=NaN,height=NaN,resizable,scrollbars');" href="#"><img valign="absmiddle" height="16" width="16" border="0" src="/olcweb/styles/shared/linkicons/image.gif"> (124.0K)</a> - Click Next. Choose the first Manufacturer and Printer listed in the window (unless this is your actual classroom printer—in this case, choose a printer you do not have).
- Click Next. In the Printer name field, key My New Printer and click Yes to make it your default printer (Figure 4).
- Click Next. Do not print a test page.
Figure 4 You can assign a name to your printer.
 <a onClick="window.open('/olcweb/cgi/pluginpop.cgi?it=jpg::::/sites/dl/free/0078805775/595818/EnrichmentActivity4_5_U04_SC04.jpg','popWin', 'width=NaN,height=NaN,resizable,scrollbars');" href="#"><img valign="absmiddle" height="16" width="16" border="0" src="/olcweb/styles/shared/linkicons/image.gif"> (26.0K)</a> <a onClick="window.open('/olcweb/cgi/pluginpop.cgi?it=jpg::::/sites/dl/free/0078805775/595818/EnrichmentActivity4_5_U04_SC04.jpg','popWin', 'width=NaN,height=NaN,resizable,scrollbars');" href="#"><img valign="absmiddle" height="16" width="16" border="0" src="/olcweb/styles/shared/linkicons/image.gif"> (26.0K)</a> - Click Finish. "My New Printer" is added to the Printers list and set as the default printer.
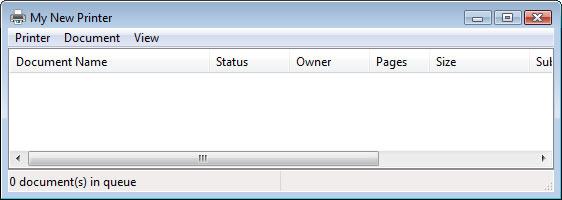
- Select My New Printer, then click the See what's printing button. The queue (the documents waiting to be printed) for My New Printer is currently empty (Figure 5).
- Select My New Printer, then click See what's printing in the Printer Tasks window. The queue (the documents waiting to be printed) for My New Printer is currently empty (Figure 5)
Figure 5 The printer queue for My New Printer
 <a onClick="window.open('/olcweb/cgi/pluginpop.cgi?it=jpg::::/sites/dl/free/0078805775/595818/EnrichmentActivity4_5_U04_SC05.jpg','popWin', 'width=NaN,height=NaN,resizable,scrollbars');" href="#"><img valign="absmiddle" height="16" width="16" border="0" src="/olcweb/styles/shared/linkicons/image.gif"> (21.0K)</a> <a onClick="window.open('/olcweb/cgi/pluginpop.cgi?it=jpg::::/sites/dl/free/0078805775/595818/EnrichmentActivity4_5_U04_SC05.jpg','popWin', 'width=NaN,height=NaN,resizable,scrollbars');" href="#"><img valign="absmiddle" height="16" width="16" border="0" src="/olcweb/styles/shared/linkicons/image.gif"> (21.0K)</a> Manage Your Printer – Part 3 Use the Print Queue Once you have installed your printer and verified the settings, you can use the Printer Queue window to control your printing tasks. Remember that the printer you created in the previous exercise will not work properly, so you may receive some error messages. In this exercise, you will correct this problem so that you can print. - Open your Bake Sale document or another document.
- Open the My New Printer window if necessary. (Click the Start button, choose Control Panel. Click the Printer link under the Hardware and Sound category. Double-click the My New Printer icon.)
- Display the Bake Sale document window, and open the Print dialog box. Look at the printer name at the top of the Print dialog box. Always make sure that the correct printer is specified to avoid printing problems. Click OK to print the document.
- Switch to the My New Printer window. Notice the new item in the printer queue (Figure 6). All print requests remain in the printer queue until they are completed or deleted.
Figure 6 A document in the print queue
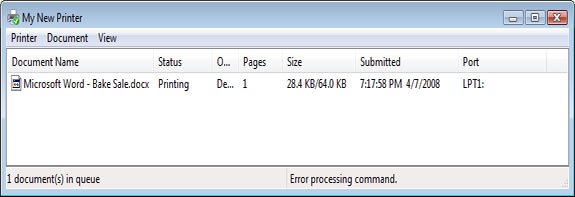 <a onClick="window.open('/olcweb/cgi/pluginpop.cgi?it=jpg::::/sites/dl/free/0078805775/595818/EnrichmentActivity4_5_U04_SC06.jpg','popWin', 'width=NaN,height=NaN,resizable,scrollbars');" href="#"><img valign="absmiddle" height="16" width="16" border="0" src="/olcweb/styles/shared/linkicons/image.gif"> (21.0K)</a> <a onClick="window.open('/olcweb/cgi/pluginpop.cgi?it=jpg::::/sites/dl/free/0078805775/595818/EnrichmentActivity4_5_U04_SC06.jpg','popWin', 'width=NaN,height=NaN,resizable,scrollbars');" href="#"><img valign="absmiddle" height="16" width="16" border="0" src="/olcweb/styles/shared/linkicons/image.gif"> (21.0K)</a> - Because My New Printer is not a real printer, the current request will never be processed. (You may even get an error message.)
- Click your document to select it in the printer queue.
- Click Document to display the Document menu, and then click Pause. The print request is paused.
- Click Document to display the Document menu again. Click Cancel (Figure 7). Click the Yes button in the warning window.
Figure 7 Cancel the print job.
 <a onClick="window.open('/olcweb/cgi/pluginpop.cgi?it=jpg::::/sites/dl/free/0078805775/595818/EnrichmentActivity4_5_U04_SC07.jpg','popWin', 'width=NaN,height=NaN,resizable,scrollbars');" href="#"><img valign="absmiddle" height="16" width="16" border="0" src="/olcweb/styles/shared/linkicons/image.gif"> (53.0K)</a> <a onClick="window.open('/olcweb/cgi/pluginpop.cgi?it=jpg::::/sites/dl/free/0078805775/595818/EnrichmentActivity4_5_U04_SC07.jpg','popWin', 'width=NaN,height=NaN,resizable,scrollbars');" href="#"><img valign="absmiddle" height="16" width="16" border="0" src="/olcweb/styles/shared/linkicons/image.gif"> (53.0K)</a> - The print request disappears from the window. (This may take a few minutes.) Close the My New Printer window.
- Display the Printers window and right-click the name of your original printer, then click Set as Default Printer.
- Select My New Printer, then press the [Delete] key. Click the Yes button in the warning window.
- Close the Printers window.
- Close your Bake Sale document.
- Exit Microsoft Word.
 |