Computer Concepts in ActionUnit 4:
Word ProcessingPrint an EnvelopeIf your printer has the capability, you can use your computer to print addresses
on envelopes. Before beginning this activity, make sure you have a blank envelope
in your printer. - Insert a blank envelope into your printer. Ask your teacher or read the printer’s
instructions for the correct way to insert an envelope.
- Start Microsoft Word.
- Click the File menu, then click New. The New Document task
pane appears.
- Under Templates, click On my computer.
- Click the Letters & Faxes tab in the Template window.
- Click Envelope Wizard, then click OK. The Envelope Wizard
box will appear (Figure 1)
 <a onClick="window.open('/olcweb/cgi/pluginpop.cgi?it=jpg::::/sites/dl/free/0078612357/271280/EA4_2_01.JPG','popWin', 'width=NaN,height=NaN,resizable,scrollbars');" href="#"><img valign="absmiddle" height="16" width="16" border="0" src="/olcweb/styles/shared/linkicons/image.gif"> (10.0K)</a> <a onClick="window.open('/olcweb/cgi/pluginpop.cgi?it=jpg::::/sites/dl/free/0078612357/271280/EA4_2_01.JPG','popWin', 'width=NaN,height=NaN,resizable,scrollbars');" href="#"><img valign="absmiddle" height="16" width="16" border="0" src="/olcweb/styles/shared/linkicons/image.gif"> (10.0K)</a>
Figure 1 The Envelope Wizard
- The Create one envelope field should be selected. Click OK.
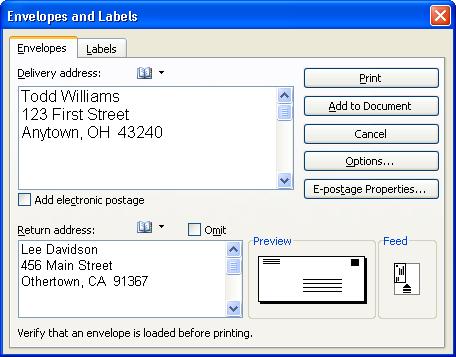
- In the Delivery address field of the Envelopes and Labels box, type
the address of the person to whom you are sending the letter.
- Type your address in the Return address field (Figure 2).
 <a onClick="window.open('/olcweb/cgi/pluginpop.cgi?it=jpg::::/sites/dl/free/0078612357/271280/EA4_2_02.JPG','popWin', 'width=NaN,height=NaN,resizable,scrollbars');" href="#"><img valign="absmiddle" height="16" width="16" border="0" src="/olcweb/styles/shared/linkicons/image.gif"> (36.0K)</a> <a onClick="window.open('/olcweb/cgi/pluginpop.cgi?it=jpg::::/sites/dl/free/0078612357/271280/EA4_2_02.JPG','popWin', 'width=NaN,height=NaN,resizable,scrollbars');" href="#"><img valign="absmiddle" height="16" width="16" border="0" src="/olcweb/styles/shared/linkicons/image.gif"> (36.0K)</a>
Figure 2 The Envelopes and Labels box
- Click Print. If you are asked to save the Return address as your
default address, click No.
- After your envelope has printed, Exit Word.
 |