Computer Concepts in ActionUnit 4:
Word ProcessingTroubleshoot Bulleted and Numbered ListsLists can be a very effective way to present a large amount of information
in a small space. Most lists are numbered or bulleted, but you can be creative
when making your own lists. In your lists, however, make sure they remain organized,
easy to read, and help contribute to the understanding of the information. To open the data file in Step 1, click on the link. If you are not able to
download the file, ask your teacher for help. - Start Microsoft Word.
- Open the
 BakeSale
(34.0K)
data
file. BakeSale
(34.0K)
data
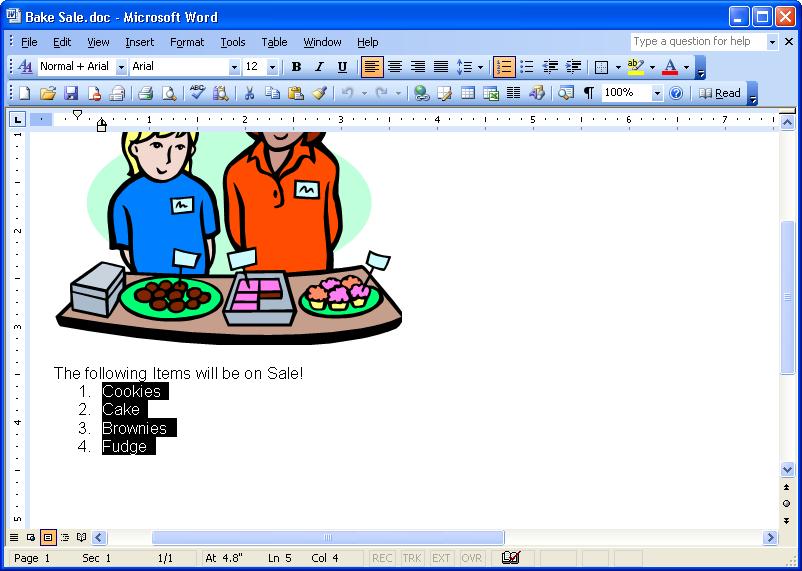
file. - Scroll down so the numbered list is visible.
- Use your mouse to highlight all of the items that will be on sale (Figure
1).
 <a onClick="window.open('/olcweb/cgi/pluginpop.cgi?it=jpg::::/sites/dl/free/0078612357/271280/EA4_3_01.JPG','popWin', 'width=NaN,height=NaN,resizable,scrollbars');" href="#"><img valign="absmiddle" height="16" width="16" border="0" src="/olcweb/styles/shared/linkicons/image.gif"> (74.0K)</a> <a onClick="window.open('/olcweb/cgi/pluginpop.cgi?it=jpg::::/sites/dl/free/0078612357/271280/EA4_3_01.JPG','popWin', 'width=NaN,height=NaN,resizable,scrollbars');" href="#"><img valign="absmiddle" height="16" width="16" border="0" src="/olcweb/styles/shared/linkicons/image.gif"> (74.0K)</a>
Figure 1 Highlight the numbered list.
- Click the Format Menu, and then click Bullets and Numbering.
- In the Bullets and Numbering dialog window, click the Bulleted tab.
Select the third panel in the first row (Figure 2).
 <a onClick="window.open('/olcweb/cgi/pluginpop.cgi?it=jpg::::/sites/dl/free/0078612357/271280/EA4_3_02.JPG','popWin', 'width=NaN,height=NaN,resizable,scrollbars');" href="#"><img valign="absmiddle" height="16" width="16" border="0" src="/olcweb/styles/shared/linkicons/image.gif"> (29.0K)</a> <a onClick="window.open('/olcweb/cgi/pluginpop.cgi?it=jpg::::/sites/dl/free/0078612357/271280/EA4_3_02.JPG','popWin', 'width=NaN,height=NaN,resizable,scrollbars');" href="#"><img valign="absmiddle" height="16" width="16" border="0" src="/olcweb/styles/shared/linkicons/image.gif"> (29.0K)</a>
Figure 2 The Bullets and Numbering box
- Click OK. The numbered list changes to a bulleted list.
- Save the file as Your Name Bake Sale.
Adjusting Bulleted and Numbered Lists
You may want to make adjustments to your lists. To change the alignment of
a list, use the ruler. 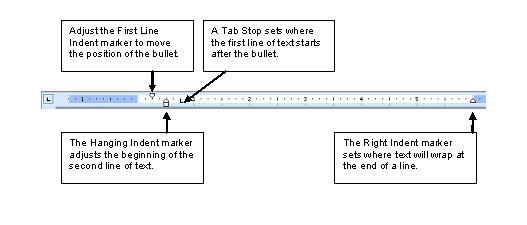 <a onClick="window.open('/olcweb/cgi/pluginpop.cgi?it=jpg::::/sites/dl/free/0078612357/271280/EA4_3_03.JPG','popWin', 'width=NaN,height=NaN,resizable,scrollbars');" href="#"><img valign="absmiddle" height="16" width="16" border="0" src="/olcweb/styles/shared/linkicons/image.gif"> (18.0K)</a> <a onClick="window.open('/olcweb/cgi/pluginpop.cgi?it=jpg::::/sites/dl/free/0078612357/271280/EA4_3_03.JPG','popWin', 'width=NaN,height=NaN,resizable,scrollbars');" href="#"><img valign="absmiddle" height="16" width="16" border="0" src="/olcweb/styles/shared/linkicons/image.gif"> (18.0K)</a>
Figure 3 You can change the alignment of the bullets using the ruler.
- Select the list.
- Use the Tab Stop to adjust the first line of text after the bullet. Move
the Tab Stop marker 0.25“ (two marks) to the right.
- Use the First Line Indent marker to move the position of the bullet. Move
the First Line Indent marker 0.25” (two marks) to the right.
- Close the file. Do not save your changes.
- Exit Microsoft Word.
 |