Computer Concepts in ActionUnit 4:
Word ProcessingUse Styles in WordMicrosoft Word uses styles to maintain a consistent format throughout a document.
A variety of default styles are available for you to use. You can modify the
pre-existing styles, or you can create your own styles. To open the data file in Step 1, click on the link. If you are not able to
download the file, ask your teacher for help. - Start Microsoft Word.
- Open your Digital Music document. Note: If you have not completed Enrichment
Activity 4.5 and have not created a Digital Music file, use the
 Digital Music
(24.0K)
data file and save it as Your
Name Digital Music. Digital Music
(24.0K)
data file and save it as Your
Name Digital Music. - Click the Styles and Formatting button to open the Styles and Formatting
task pane.
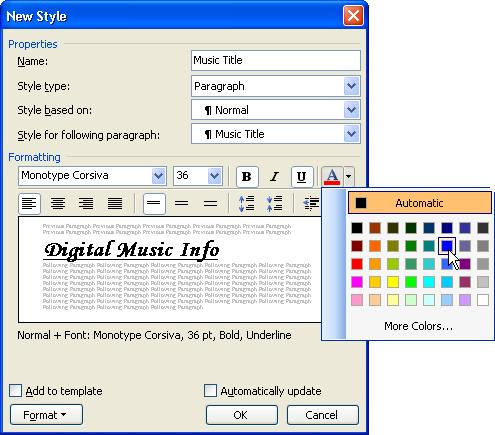
- Click the New Style button. The New Style box opens.
- In the Name field, key Music Title.
- Under Formatting, use the arrows to change the font to Monotype Corsiva and
the font size to 36. If your computer does not have Monotype Corsiva font, use
a font of your choice.
- Click the Bold and Underline buttons. Change the text color to Blue (Figure
1).
 <a onClick="window.open('/olcweb/cgi/pluginpop.cgi?it=jpg::::/sites/dl/free/0078612357/271280/EA4_7_01.JPG','popWin', 'width=NaN,height=NaN,resizable,scrollbars');" href="#"><img valign="absmiddle" height="16" width="16" border="0" src="/olcweb/styles/shared/linkicons/image.gif"> (47.0K)</a> <a onClick="window.open('/olcweb/cgi/pluginpop.cgi?it=jpg::::/sites/dl/free/0078612357/271280/EA4_7_01.JPG','popWin', 'width=NaN,height=NaN,resizable,scrollbars');" href="#"><img valign="absmiddle" height="16" width="16" border="0" src="/olcweb/styles/shared/linkicons/image.gif"> (47.0K)</a>
Figure 1 The New Style box
- Click OK to return to the task pane.
- In the document, place the insertion point anywhere on the word “Digital.”
Then click Music Title in the task pane to apply the new style to the title
“Digital Music Info.”
- In the document, click the word File, and then click Heading 2 in the task
pane.
- Click the word Copyright, and then click Heading 2 in the task pane.
- In the task pane, move your mouse pointer over Heading 2, then click the
arrow that appears. Click Modify (Figure 2). The Modify Style box opens.
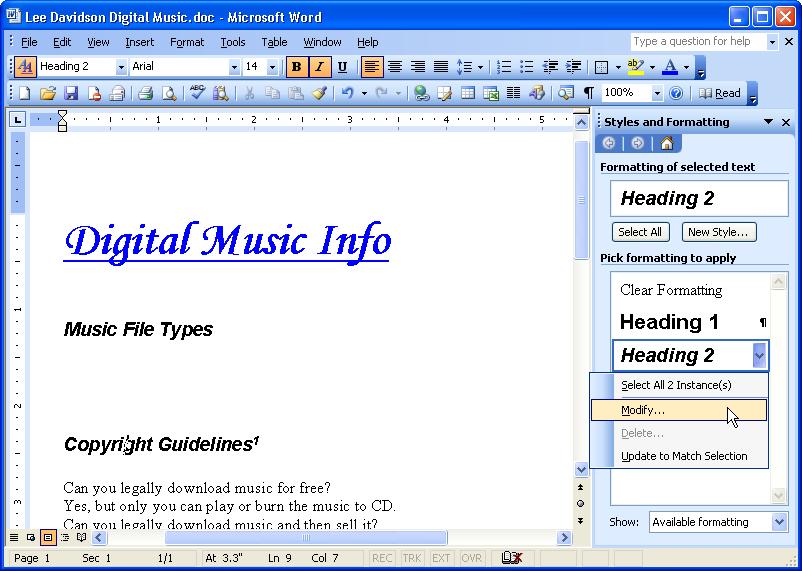 <a onClick="window.open('/olcweb/cgi/pluginpop.cgi?it=jpg::::/sites/dl/free/0078612357/271280/EA4_7_02.JPG','popWin', 'width=NaN,height=NaN,resizable,scrollbars');" href="#"><img valign="absmiddle" height="16" width="16" border="0" src="/olcweb/styles/shared/linkicons/image.gif"> (90.0K)</a> <a onClick="window.open('/olcweb/cgi/pluginpop.cgi?it=jpg::::/sites/dl/free/0078612357/271280/EA4_7_02.JPG','popWin', 'width=NaN,height=NaN,resizable,scrollbars');" href="#"><img valign="absmiddle" height="16" width="16" border="0" src="/olcweb/styles/shared/linkicons/image.gif"> (90.0K)</a>
Figure 2 Modify a style using the drop-down menu.
- Use the arrow to change the color to Red.
- Click OK. Both lines turn red (see Figure 4).
 <a onClick="window.open('/olcweb/cgi/pluginpop.cgi?it=jpg::::/sites/dl/free/0078612357/271280/EA4_7_03.JPG','popWin', 'width=NaN,height=NaN,resizable,scrollbars');" href="#"><img valign="absmiddle" height="16" width="16" border="0" src="/olcweb/styles/shared/linkicons/image.gif"> (89.0K)</a> <a onClick="window.open('/olcweb/cgi/pluginpop.cgi?it=jpg::::/sites/dl/free/0078612357/271280/EA4_7_03.JPG','popWin', 'width=NaN,height=NaN,resizable,scrollbars');" href="#"><img valign="absmiddle" height="16" width="16" border="0" src="/olcweb/styles/shared/linkicons/image.gif"> (89.0K)</a>
Figure 3 Heading 2 has been applied.
- Close the task pane and save your file.
- Exit Microsoft Word.
 |