Computer Concepts in ActionUnit 4:
Word ProcessingCreate and Format TablesCreate and Format Tables – Part 1 Create Tables Using Different Options Tables are a great way to organize information so it is both useful and visually
appealing. Microsoft Word offers a variety of ways to quickly and easily create
tables in order to help you better organize your information. To open the data file in Step 1, click on the link. If you are not able to
download the file, ask your teacher for help. - Start Microsoft Word.
- Open your Digital Music document. (Note: If you have
not created a Digital Music file in previous activities, use the
 Digital Music
(24.0K)
data file and save it
as Your Name Digital Music.) Digital Music
(24.0K)
data file and save it
as Your Name Digital Music.) - Click the Tables and Borders button. The Tables and Borders toolbar
appears.
- Click the Draw Table button. Your cursor should become a pencil.
Note: To identify buttons on the Tables and Borders toolbar, move your mouse
pointer over the buttons to display the names.
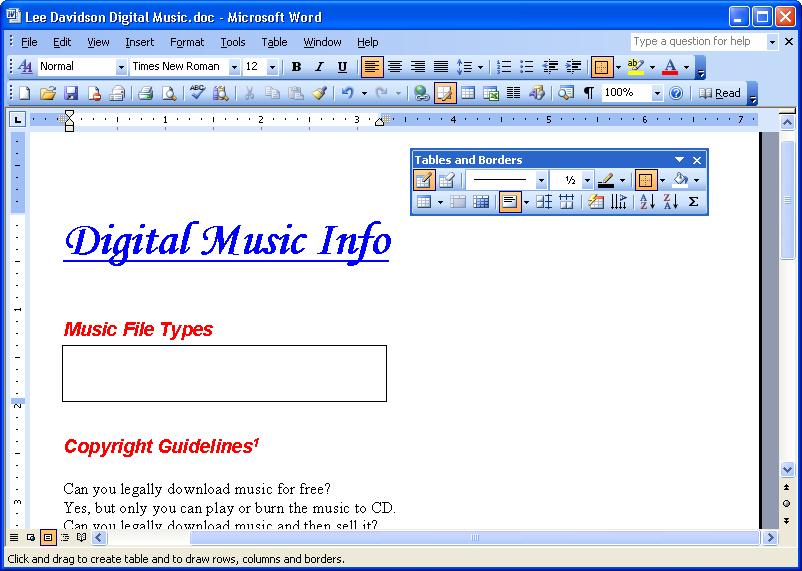
- Position the pencil under the M in Music File Types, click and drag
the box to the right and down (Figure 1).
 <a onClick="window.open('/olcweb/cgi/pluginpop.cgi?it=jpg::::/sites/dl/free/0078612357/271280/EA4_8_01.JPG','popWin', 'width=NaN,height=NaN,resizable,scrollbars');" href="#"><img valign="absmiddle" height="16" width="16" border="0" src="/olcweb/styles/shared/linkicons/image.gif"> (83.0K)</a> <a onClick="window.open('/olcweb/cgi/pluginpop.cgi?it=jpg::::/sites/dl/free/0078612357/271280/EA4_8_01.JPG','popWin', 'width=NaN,height=NaN,resizable,scrollbars');" href="#"><img valign="absmiddle" height="16" width="16" border="0" src="/olcweb/styles/shared/linkicons/image.gif"> (83.0K)</a>
Figure 1 Draw a table.
- Inside the box, draw one vertical and one horizontal line.
- On the Tables and Borders toolbar, click the Distribute Rows Evenly
and Distribute Columns Evenly buttons on the Tables and Borders toolbar.
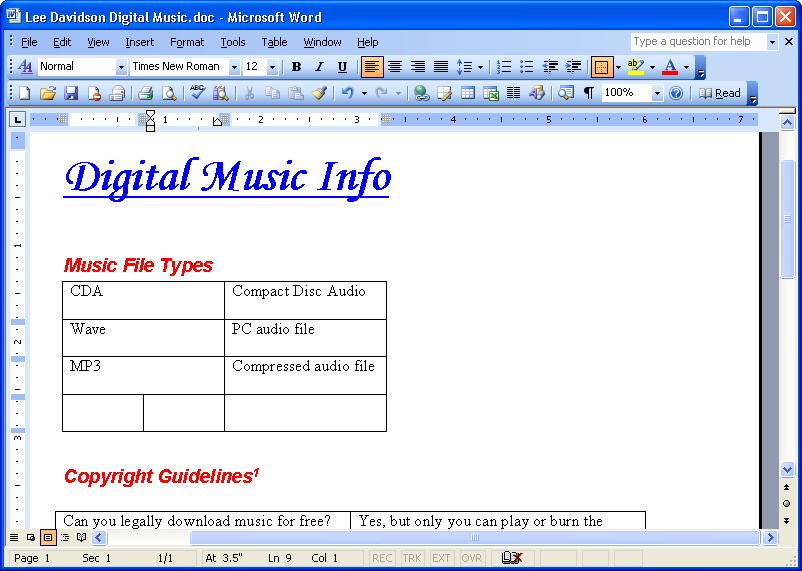
- Use the information in Figure 2 to fill in the table.
- Close the Tables and Borders toolbar.
 <a onClick="window.open('/olcweb/cgi/pluginpop.cgi?it=jpg::::/sites/dl/free/0078612357/271280/EA4_8_02.JPG','popWin', 'width=NaN,height=NaN,resizable,scrollbars');" href="#"><img valign="absmiddle" height="16" width="16" border="0" src="/olcweb/styles/shared/linkicons/image.gif"> (83.0K)</a> <a onClick="window.open('/olcweb/cgi/pluginpop.cgi?it=jpg::::/sites/dl/free/0078612357/271280/EA4_8_02.JPG','popWin', 'width=NaN,height=NaN,resizable,scrollbars');" href="#"><img valign="absmiddle" height="16" width="16" border="0" src="/olcweb/styles/shared/linkicons/image.gif"> (83.0K)</a>
Figure 2 Enter the information.
- Select all of the text under Copyright Guidelines.
- Click the Table menu, choose Convert, and then click Text
to Table.
- In the Convert Text to Table box, type the number 2 in the
Number of columns field. Then click OK.
- Click anywhere in the document to deselect the text. A new table is created
using the selected text (see Figure 3).
 <a onClick="window.open('/olcweb/cgi/pluginpop.cgi?it=jpg::::/sites/dl/free/0078612357/271280/EA4_8_03.JPG','popWin', 'width=NaN,height=NaN,resizable,scrollbars');" href="#"><img valign="absmiddle" height="16" width="16" border="0" src="/olcweb/styles/shared/linkicons/image.gif"> (86.0K)</a> <a onClick="window.open('/olcweb/cgi/pluginpop.cgi?it=jpg::::/sites/dl/free/0078612357/271280/EA4_8_03.JPG','popWin', 'width=NaN,height=NaN,resizable,scrollbars');" href="#"><img valign="absmiddle" height="16" width="16" border="0" src="/olcweb/styles/shared/linkicons/image.gif"> (86.0K)</a>
Figure 3 Convert text to a table.
- Select your new Copyright Guidelines table.
- Click the Table menu, choose Convert, and then click Table
to Text.
- In the Convert Table to Text box, select Paragraph Marks and
click OK. Your table has been converted back to text.
- Click the Undo Typing arrow to restore your table.
Create and Format Tables – Part 2 Work with Columns and Rows Once it has been created, it is easy to modify the table structure. You can
add or delete rows and columns, or change the way they are formatted. - Move the insertion point to the end of the word Wave in the first
table.
- Click the Table menu, choose Insert, and then click Rows
Below. A new row will be created.
- Repeat Step 2.
- In the new third row, type MP3 in the first column and Compressed
audio file in the second column.
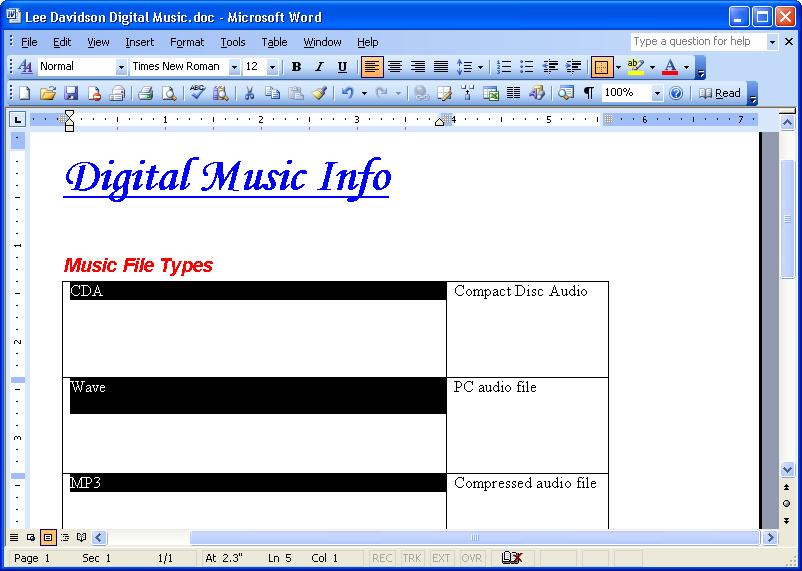
- Position the insertion point in the cell underneath MP3. Click the Table
menu, and then click Split Cells.
- Click OK in the Split Cells box. The cell is split into two
cells (Figure 4).
 <a onClick="window.open('/olcweb/cgi/pluginpop.cgi?it=jpg::::/sites/dl/free/0078612357/271280/EA4_8_04.JPG','popWin', 'width=NaN,height=NaN,resizable,scrollbars');" href="#"><img valign="absmiddle" height="16" width="16" border="0" src="/olcweb/styles/shared/linkicons/image.gif"> (80.0K)</a> <a onClick="window.open('/olcweb/cgi/pluginpop.cgi?it=jpg::::/sites/dl/free/0078612357/271280/EA4_8_04.JPG','popWin', 'width=NaN,height=NaN,resizable,scrollbars');" href="#"><img valign="absmiddle" height="16" width="16" border="0" src="/olcweb/styles/shared/linkicons/image.gif"> (80.0K)</a>
Figure 4 Split the cells in a table.
- Click the Table menu, choose Delete, then Rows to delete
the row.
- Position the insertion point before MP3. Click the Table menu, and
then click Split Table. The table is separated.
- Press the Delete key. The table is automatically joined again.
- Position the insertion point in the same cell as Compact Disc Audio. Click
the Table menu, select Insert, and click Columns to the Right.
A new column appears.
- Select the empty cell in the lower right hand corner of the table. Click
the Table menu, select Delete, and click Cells.
- In the Delete Cells box, select Shift cells left and click
OK. The cell disappears.
- Position the insertion point where there is now no cell (outside of the
table, next to “Compressed audio file”). Click the Table
menu, select Insert, then Cells.
- In the Insert Cells box, select Shift cells right and click
OK. A new cell appears.
- Select the three cells in the empty column. Right-click on
the highlighted column and choose Delete Columns. The column disappears.
- Select the first column in the Music File Types table.
- Click the Table Menu, and then click Table Properties. The
Table Properties box opens. Click the Column tab, if it is not already
selected.
- In the Preferred width field, type the number 4,
and then click OK. The first column is now 4 inches wide.
- Click the Table Menu, and then click Table Properties. In
the Table Properties box, click the Row tab.
- In the Specify height field, type the number 1.
- In the Row height is field, use the arrow to choose Exactly.
- Click OK. Your table should look like the one in Figure 5.
 <a onClick="window.open('/olcweb/cgi/pluginpop.cgi?it=jpg::::/sites/dl/free/0078612357/271280/EA4_8_05.JPG','popWin', 'width=NaN,height=NaN,resizable,scrollbars');" href="#"><img valign="absmiddle" height="16" width="16" border="0" src="/olcweb/styles/shared/linkicons/image.gif"> (73.0K)</a> <a onClick="window.open('/olcweb/cgi/pluginpop.cgi?it=jpg::::/sites/dl/free/0078612357/271280/EA4_8_05.JPG','popWin', 'width=NaN,height=NaN,resizable,scrollbars');" href="#"><img valign="absmiddle" height="16" width="16" border="0" src="/olcweb/styles/shared/linkicons/image.gif"> (73.0K)</a>
Figure 5 Change the height and width of the first row.
- Click the Table Menu, and then click Table Properties.
- In the Table Properties box, change Specify height to 0 and
Row height is to At least.
- Click the Column tab. In the Preferred width field, key the
number 0.
- Click OK. The cells adjust to fit the tallest and widest entries
(Figure 6).
 <a onClick="window.open('/olcweb/cgi/pluginpop.cgi?it=jpg::::/sites/dl/free/0078612357/271280/EA4_8_06.JPG','popWin', 'width=NaN,height=NaN,resizable,scrollbars');" href="#"><img valign="absmiddle" height="16" width="16" border="0" src="/olcweb/styles/shared/linkicons/image.gif"> (93.0K)</a> <a onClick="window.open('/olcweb/cgi/pluginpop.cgi?it=jpg::::/sites/dl/free/0078612357/271280/EA4_8_06.JPG','popWin', 'width=NaN,height=NaN,resizable,scrollbars');" href="#"><img valign="absmiddle" height="16" width="16" border="0" src="/olcweb/styles/shared/linkicons/image.gif"> (93.0K)</a>
Figure 6 The table now fits the content.
- Save your file.
Create and Format Tables – Part 3 Use Table AutoFormats Word offers you the ability to automatically format your table using a variety
of standard table styles. In this exercise you will use the AutoFormat and AutoFit
functions to add some variety to your Digital Music file. - In your Digital Music file, select the Music File Types table.
- Click the Tables and Borders button. The Tables and Borders toolbar
opens.
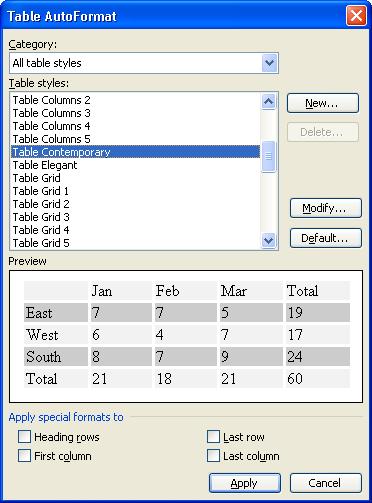
- Click the Table AutoFormat button on the toolbar (Note: Move your
mouse pointer over the toolbar to identify the correct button.). The Table
AutoFormat box opens.
- Scroll through the Table Styles until Table Contemporary is
visible (Figure 7). Select Table Contemporary then click Apply. Your
table should look like Figure 7.
 <a onClick="window.open('/olcweb/cgi/pluginpop.cgi?it=jpg::::/sites/dl/free/0078612357/271280/EA4_8_07.JPG','popWin', 'width=NaN,height=NaN,resizable,scrollbars');" href="#"><img valign="absmiddle" height="16" width="16" border="0" src="/olcweb/styles/shared/linkicons/image.gif"> (39.0K)</a> <a onClick="window.open('/olcweb/cgi/pluginpop.cgi?it=jpg::::/sites/dl/free/0078612357/271280/EA4_8_07.JPG','popWin', 'width=NaN,height=NaN,resizable,scrollbars');" href="#"><img valign="absmiddle" height="16" width="16" border="0" src="/olcweb/styles/shared/linkicons/image.gif"> (39.0K)</a>
Figure 8 The Table AutoFormat box
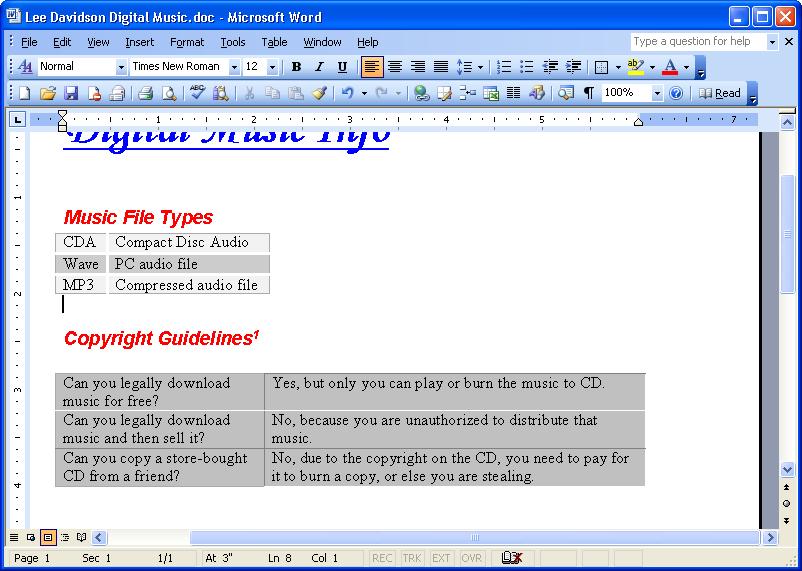
- In your document, select the Copyright Guidelines table. Click the Table
AutoFormat button on the toolbar.
- In Table Styles, choose Table 3D effects 2. Uncheck Heading rows
and Last row checkboxes.
- Click Apply.
- Click the Table menu, then click AutoFit, and then click AutoFit
to Contents.
- Close the Tables and Borders toolbar. Deselect the
table. Your tables should look like Figure 8.
 <a onClick="window.open('/olcweb/cgi/pluginpop.cgi?it=jpg::::/sites/dl/free/0078612357/271280/EA4_8_08.JPG','popWin', 'width=NaN,height=NaN,resizable,scrollbars');" href="#"><img valign="absmiddle" height="16" width="16" border="0" src="/olcweb/styles/shared/linkicons/image.gif"> (88.0K)</a> <a onClick="window.open('/olcweb/cgi/pluginpop.cgi?it=jpg::::/sites/dl/free/0078612357/271280/EA4_8_08.JPG','popWin', 'width=NaN,height=NaN,resizable,scrollbars');" href="#"><img valign="absmiddle" height="16" width="16" border="0" src="/olcweb/styles/shared/linkicons/image.gif"> (88.0K)</a>
Figure 8 The completed table
- Save your file.
- Exit Microsoft Word.
 |  |